
DOWNLOAD THE APP


Customer Services
Copyright © 2025 Desertcart Holdings Limited
DOWNLOAD THE APP


🚀 Build the legend. Own the legacy.
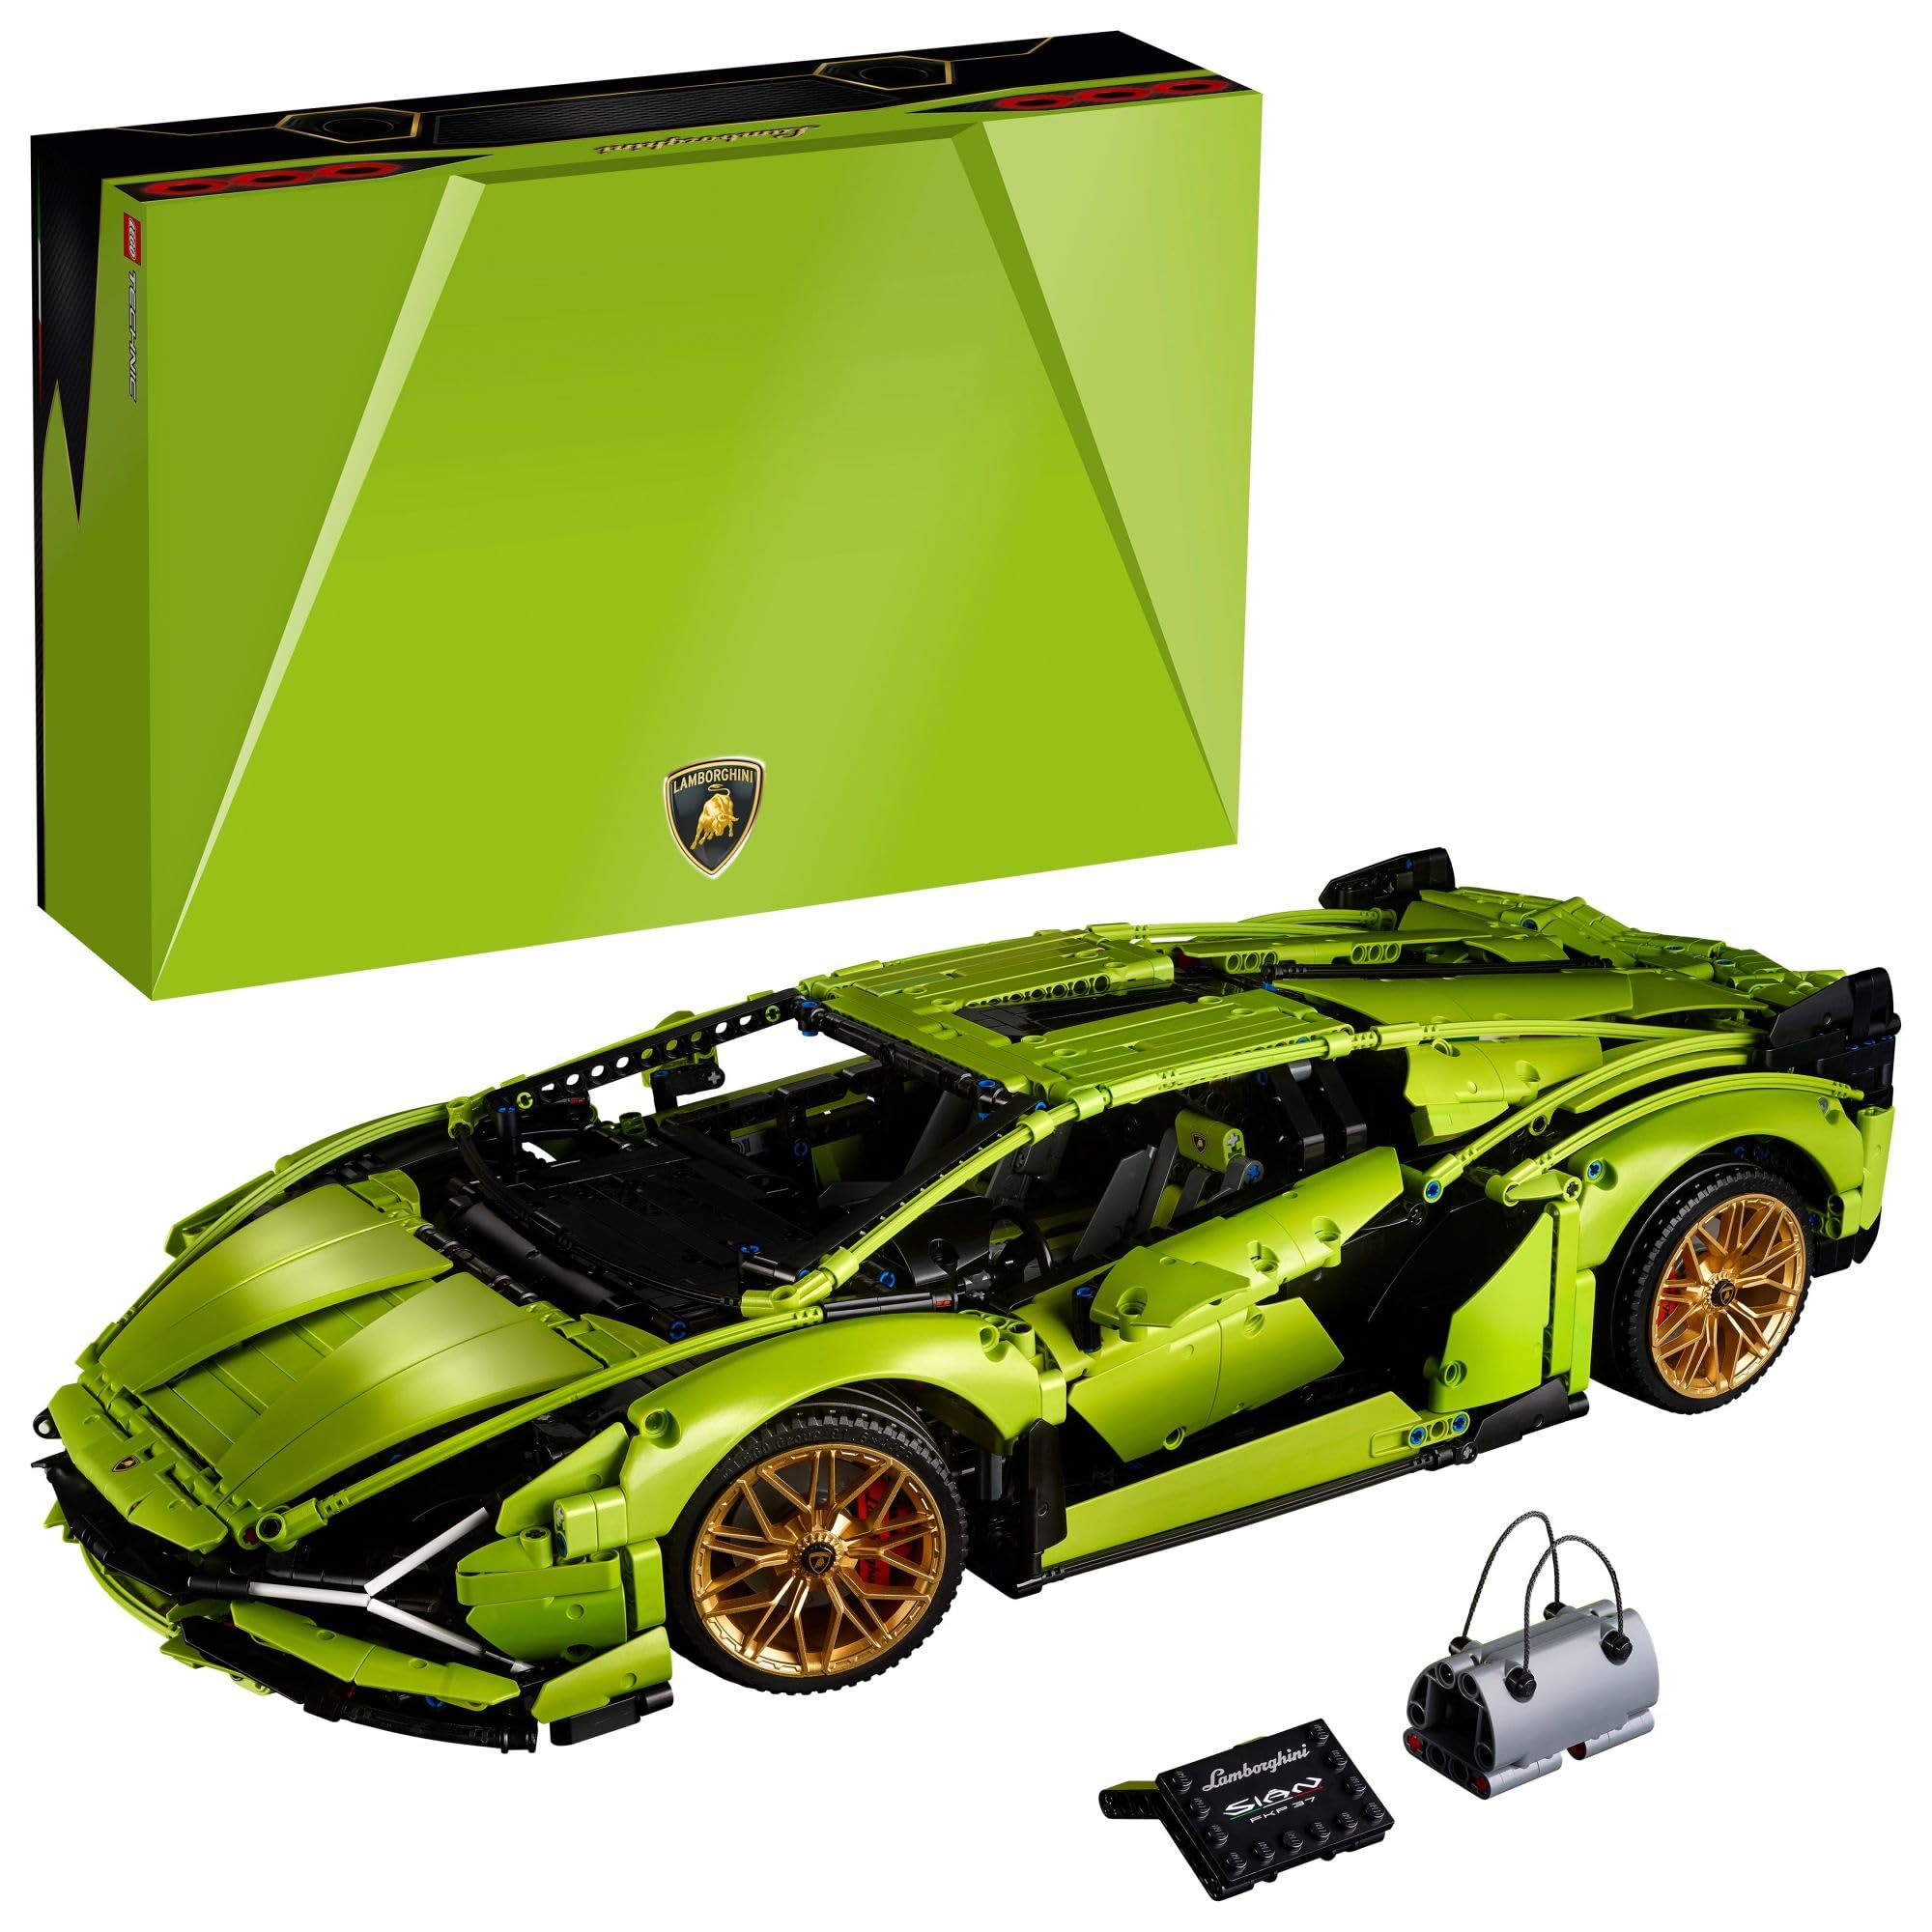
The LEGO Technic Lamborghini Sián FKP 37 is a premium 3,696-piece building set designed for adults, replicating the iconic supercar at 1:8 scale. Featuring a working V12 engine with moving pistons, 8-speed transmission, functional steering, suspension, and scissor doors, this collector’s edition model combines engineering excellence with stunning lime green aesthetics and golden rims. It includes a unique serial number, decorative display plate, and an exclusive book, making it a perfect gift and display piece for automotive and LEGO enthusiasts alike.


| ASIN | B0858F13V7 |
| Customer Reviews | 4.8 4.8 out of 5 stars (2,709) |
| Item Weight | 0.502 ounces |
| Item model number | 6288790 |
| Manufacturer | LEGO |
| Manufacturer recommended age | 18 years and up |
| Product Dimensions | 22.44 x 14.76 x 5.91 inches |
| Release date | August 21, 2020 |
D**R
Review from first-time Lego builder
I wanted something to do with my brain that didn't involve screens or text, so this was an impulse buy in an attempt to fulfill that requirement. Since I'd never built a Lego model before (Technic or otherwise), should I have started with something smaller and easier? Probably. But once I got started, the only way out was through, and in the end I finished the build with only two or three cosmetic errors that most people won't notice. Mechanically I was able to get everything working--the gearbox, the scissor doors, and the rear spoiler--without having to tear things down and re-do several dozen steps. I didn't time myself, but it took me about ten days start to finish, working a few hours a day. So this build can be completed by novices, but if you're a novice and you start this, here's some advice. (This is probably all common sense to more practiced builders.) It's easy enough to say "follow the manual exactly and you'll be fine," but "exactly" needs some definition here. --Be sure before you begin that you can tell the difference between black, dark gray, and light gray pieces, and that you see how these colors are represented in the manual. The most visible mistake I made was using a black piece instead of a gray one to mount the rear differential at the beginning of the build, which meant I had a leftover gray piece I had to use in the otherwise all-black undercarriage a couple of hundred steps later. It's only visible if you turn the car upside down, though. I'll live. --Many errors can be prevented by gathering the pieces for each step before you begin that step. Note that, in the manual, the number of pieces for each step is below it and to the left--it is easy when working to confuse that number with the number indicating the length of some pieces, which appears to the right of the piece. --Don't throw away bags, even if you're sure they're empty, not until the build is complete. They might not be empty. One of them probably isn't. --Sometimes there'll be a picture of a piece with a green check mark next to it, and a picture next to it of that same piece with a red X next to it. A quick glance might suggest the pictures are identical: they are not! Look at them until you understand the difference. It's always important. --Pay particular attention to the differentials--they have fiddly tiny gears that have to be properly seated, and they must be mounted exactly as the manual specifies for them to function correctly (including their orientation). --The hardest part of the build, the gearbox, is at the beginning, and because you're basically building the model from the inside out, a mistake here that you don't catch until later might send you back to the beginning to fix it. The gearbox is built in layers, more or less: at each step, make sure that the positions of the gears exactly match the images in the manual, including the positions of the components in the top layer relative to layers beneath it. --Note when the manual tells you to push a pin into a hole only partway--you'll usually have to push it the rest of the way in later on to connect it to a part of the model you haven't built yet. Also, the direction in which you push pins is important, and should always match the manual. --Always work on the model from the point of view of the manual's images--when it tells you to rotate the model, rotate it as specified. Spot-check the model agains the manual regularly and look for anomalies. --The build is symmetrical, except when it isn't--if you see an asymmetry that doesn't make sense to you, check it against the manual. If it's there, too, trust the process. --In general, when making anything involving a hinge, leave it in the exact position the manual specifies until the manual tells you otherwise (and the manual doesn't always explicitly call out changes to position--you'll have to notice them). In particular this is important when building the doors. --In the second half of the build, the exterior, there are a lot of black and lime green pieces that look a whole lot alike. Don't confuse pegs with round cross sections with pegs that have X-shaped cross sections. Check the width and length of pieces; compare them to the 1:1 drawings in the manual. --Some pieces have printed decorations. Save those pieces for the steps in which the manual calls for them. If you see a special piece like this in the bags, put it aside immediately. --Don't build when you're tired. Building this model was an interesting, challenging experience--I'm not going to lie, at some points I thought I was in over my head, but it all turned out well in the end and I might tackle something like this again sometime, now that I know what I'm doing a bit better. A great piece of engineering, too--it's really impressive when you get the thing done and see how it all works. Money well spent.
L**.
Amazing Set From Lego
First let me say this is a great kit from Lego. I have built or helped build many of my Kids Lego sets over the years, but this is one of the ones I bought basically for myself to build. This is a challenging build for sure, but if the directions are followed exactly how they are written you model will turn out great. It took me approx. 20 hours of work to assemble the kit spread out over 5 days. I have read a lot of the negative reviews about missing pieces, etc. Let me say that I have never found a Lego set to be missing pieces. Now, maybe I'm extremely lucky in that regard, but more than likely its because I'm meticulous when I build things and check and double check assemblies before moving on to the next step. You really have to pay attention to which parts you are selecting during the build process, especially with this kit since you need to open up multiple bags at one time and have hundreds of parts jumbled together, unlike most Lego sets where you open bags in order, one bag at a time. Many pieces resemble others, and if the correct parts aren't chosen you are going to think you are missing parts at the end of a build section. I suspect that is what a lot of people are doing that say they have missing parts. Believe me, nobody is perfect, and I make mistakes as well when building, but by checking yourself as you build you can avoid a lot of headache later trying to figure out what is wrong. I'll give you a couple examples of errors that I made when building this car. One was an easy fix - when I got near to the end of box 3 I discovered I didn't have one of the black pieces in step 504 that was to be one of the paddle shifters. I looked through all of the pieces I had left from that box and discovered that instead of the black piece I had a gray piece exactly like it left. That told me right there that I had screwed up somewhere earlier in the build and had selected a black piece earlier instead of a gray piece. I could have complained to Lego and told them they screwed up and gave me the wrong piece, but instead I figured I had made an error. So, I started going back through the pages looking for steps that had the same piece, but only in gray. Well, when I got back to the section where the seats were build sure enough I had inadvertently picked a black piece instead of a gray piece for one of the seats. It took about 10 minutes to disassemble seat to swap the parts. Result - no missing piece, builder error. I have also read on here complaints about the gears not working and the car not rolling because the front and back wheels work in different directions. If you think about it, do you really think Lego would put out a set where the wheel worked in opposite directions or the gears didn't work and not have almost every single person building the set not complain? Bottom line is if your gears don't work or the front and back wheels work in opposite directions you screwed up somewhere in the build. I can attest to this myself as this was the other error I made during assembly. When I was assembling the front differential gears I wasn't paying complete attention and flip the front differential gear housing from what it showed in the manual. If you're tired or rushing through the build it's an easy error to make. Once I had the front drive train installed the first thing I did was to check the rotation of all four wheels. Sure enough the front wheels were rotating in the opposite direction of the rear wheels. I knew almost right away what I had done, and when I compared what I had built to the drawings on step 222 in the manual I confirmed it was my mistake. It doesn't seem like a big deal how that housing goes in, but if it is installed with the gear on the housing to the right instead of how it shows it should be on the left, the front wheels will work in the opposite direction that they should. Another review I read complained about extra parts being in box one. Boxes one and two are rather large and can hold a lot of parts. Boxes three, four, and five are a lot smaller and have limited space. Those boxes are already stuffed with parts, and the last thing you really want is to have plastic parts crammed into a box and be deformed from being put in there like that. The best thing to do is to add a few bigger parts from those boxes and put them in one of the boxes that have more room, such as box one. That is why there are a lot of extra parts in box one, not because they screwed up. Also, when you get to the various pages in the manual where you are starting on a new box the first picture on that page will show you what the car will look like when that box is complete, what bag numbers to use, and it will show the extra parts from box one that you will need. For example for box three on page 260 it shows the car as it will look once that box is complete, it shows you will need bags 3, and then it shows 8 of the one black pieces, 1 of the black rectangular pieces, and two of the long red pieces. Those are found in box one as I mentioned, because again there is no room for them in box three. So again, the loose parts in box one and the parts in unmarked bags are for other boxes. A couple of the pictures I attached show my finished car - it really is beautiful what Lego has done with this. The front boot opens, the spoiler goes up and down, the transmission works, you can put the car in neutral from the shifter in the center console so that the engine can be disconnected from the drive train, the scissor doors open, the steering works, etc. In regards to missing pieces - almost 100% I can tell you that if you think you have a missing part or parts it's because you didn't build something correctly and/or used the wrong parts when building it. The one picture I attached shows what kind of pieces shouldn't be left over, not only in this kit but in other Lego sets as well. It's the picture with five pieces in it. Those are not the kinds of pieces you want left at the end of a build step - if you have those kinds of pieces left over you probably screwed up somewhere. In another one of my pictures it shows about 23 little pieces - connectors, single tile pieces, etc. These are the kinds of parts that are usually extra in kits, and the ones shown in the picture are exactly what I had left after building mine. Actually I was surprised I had 5 of the black connectors left, but there were hundreds of those in the kits (actually 511 per the back of the manual) so you can expect several extra of those. Bottom line is this is a beautiful, extremely well thought out and designed model. I don't work for Lego, I just admire their attention to detail and don't like them getting a bad rep for what is almost completely and extremely likely human error on parts of the builders.
J**F
Lamborghini Sian
Of course it's a Lego technic which means quality. It also comes with the Lego price tag too. There were no missing pieces, and the assembly was so smooth due to the outstanding directions and piece quality. Color consistency is always top notch. It's definitely a must have for any serious builder and collector. This is the third of the four large 1:8 scale supercars I have invested in from Lego and you know that the fourth is on my shopping list.
A**5
Super captivating and high quality entertainment
Ordered on Friday, received in 2 days on Sunday as advertised by amazon. Packaging was beautiful and undamaged. This set was on sale 15% off MSRP when I bought it, so given the price tag- I was happy to save a couple bucks. The design of this build is truly impressive. I loved building out the gearbox, engine, frame, doors and everything else. Super captivating and high quality entertainment for a solid 12-16 focused hours. There isn’t anything particularly challenging about the build in my opinion. Just be detail oriented and carefully follow the instructions and the end result will be perfect. It’s such an expensive set, but I’m glad I splurged this time.
U**N
Es un regalo y quede sorprendido de la calidad y tamaño
A**S
Fun and interesting build, and looks really nice on display once finished, just make sure you follow the instructions carefully, nothing to dislike.
M**R
Even though the product came from the US, delivery was fast, good tracking and updates. Model itself was a great build, as expected from Lego!
A**O
Como sempre o preço de lego no brasil intimida compradores em potencial, tornando esse produto realmente para colecionadores. O conjunto em si é excelente, com a qualidade esperada pelo nome Lego, e o preço que vem junto. Levei um total de 8 horas para montar, distribuídas por uma semana. O conjunto montado também é muito bonito e bem interativo, até agora permaneço impressionado com a caixa de 8 marchas que foram reproduzidas junto do motor V12, com todos os 12 pistões que funcionam quando o carro se movimenta. O carro também conta com mecanismo para abrir as portas, e levantar o aerofólio. O volante faz as rodas se curvarem, o câmbio funciona para colocar o carro no ponto morto ou marcha ré e a borboleta do volante funciona para trocar as marchas. *O CARRO NÃO ANDA SOZINHO* Não tem motor elétrico ou via fricção.
M**N
Ein paar Teile fehlten, mehr muß man nicht sagen...
Trustpilot
3 days ago
2 weeks ago