Desert Online General Trading LLC
Dubai, United Arab Emirates
Desert Online General Trading LLC
Dubai, United Arab Emirates


🚀 Elevate Your 3D Printing Game!
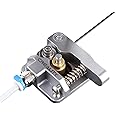
The Creality Ender 3 /Pro/V2 3D Printer Assembled Extruder MK8 HotEnd Kit features a 24V system with a 0.4mm nozzle upgrade and low friction Creality-Capricorn PTFE tubing, designed for enhanced performance and compatibility with various Ender models. This kit ensures smoother filament flow, reduced clogging, and improved print quality, making it a must-have for serious 3D printing enthusiasts.
S**R
Great for the price and works well
Worked great. Got it just intime to finish some important prints. I've had no issues out of it so far and it's relitivly easy to install. It extracts great from what I can tell. Deffinitly up to standards my print quality are as expected
A**.
Amazing product
I put this hotend on my ender 3 stock printer. The temperature sensor was broken on my last hotend, and in the process of trying to remove the temperature sensor, it broke inside of there. I got this, it looks awesome, works amazingly and I love the fact that it comes with capricorn tubing, and 4 0.4mm nozzles. I had some trouble fitting the fan housing over the new nozzle but otherwise perfect. This does not come with any screws or mounting hardware, so make sure not to lose it. It also comes with the silicone heat covers but I keep mine off to see the nozzle better. Overall, 5/5 because it fixed my printer and came with some other upgrades or replacements too.
J**R
This made my Ender 3 V2 run like new again.
I've owned an Ender 3 V2 for about two years. After a few failed prints and a blobby melted filament disaster, I couldn't seem to get my Ender 3 to work well without sputtering and clogging, and it was shelved. I tried to resurrect it with fresh nozzles and a replacement heatbreak, but it never quite worked right after that.When I realized how inexpensive it was to replace the whole hot-end, I decided to go ahead and dive in.Replacing the hot-end itself on the printer was pretty easy, and only involved a few screws to remove the plastic shroud and access the old hot-end. However, wiring it up was a lot trickier.After cutting the factory cable ties, you have to flip the whole printer on its side and remove the cover plate on the bottom. Take a bunch of reference photos of this space so that it's easier to repackage everything later.The new wires need to be fished through two expanding mesh cable organizer sleeves, which tend to want to want to fray at the ends and snag on the wires. You're better off cutting the original wires at the old hot-end and taping them to the ends of the new wire bundle so you can use them to fish the new wires through.Then, you'll need to unscrew the terminal blocks to detach the old wires, and install the new ones, and remove the tiny plug for the thermostat and replace it with the new one. The blocks on the control board were covered with dabs of hot-glue to prevent the wires from coming loose, so you'll have to pick those off with a pair of needle-nose pliers before you can access them.I found that tightening down the terminal blocks on the new wire ends took a few tries, as they're a little hard to reach and it's difficult to see if each wire tip is in the little metal clamp as it's being tightened. Give it a light tug once the screw is snug. If it comes out, unscrew and start over.Once everything is secure, it's important to bundle up excess wire and tuck it back in neatly. Watch that the wires aren't pressing on the cooling fan inside the case, as mine was, or it'll buzz horribly and you'll have to open it back up again and rearrange. Also, as you're putting the new zip ties on the cable organizer, be sure to pay attention to whether or not they're snagging on the moving parts like the bed and gantry.So for the quality of product and the value, I think it's excellent, but I do rate the difficulty of the install pretty high as the wire routing is fussy and the wiring / controller board compartment is a little tight and difficult to pack neatly.
A**R
Good for the price
I had a short that blew out the thermistor and heater on my stock Ender 3 Pro hotend. I could buy replacements of both shorted items, in multiples, that would be cheaper or about equal to what this package ended up costing depending on how many extras you buy. Example, you can get a six pack with three thermistor and three heater cartridges for $9. Reputation with those is you might get some lemons cause they are cheap both in cost and in quality control. All things considered getting a pair of new pneumatic fittings, extra nozzles, new PTFE, new heater, new thermistor, couple silicon socks, and the entire hotend was a pretty good value so I went with this instead.I read some other product reviews which mentioned this hotend may not be assembled correctly upon receiving and that some people had random failures as result. I removed the nozzle, removed the PTFE tube, and removed the pneumatic fitting. I checked the screws through the heat block into the heatsink, grub screws, and how tight the thermistor screw was. I onced over all of it and didn't see any glaring issues with mine. I would recommend you do the same and not make the assumption it is up to your standards.Then I started the install. I cut a couple mm off the end on the PTFE with PTFE cutter, just so I knew it was flush. I attached the PTFE and hot tightened the nozzle how I prefer to remove gaps and clogs. While the bowden was off the extruder I redid my cold extruder calibration and updated the e-steps. I test the heater and thermistor for any heat creep or functional issues before assembling everything. Installation took about thirty minutes and most of it is chewed up in wire management.Attached photos are what prints are looking like with this hotend after I did a PID tune, recalculated the Z offset, and then did some first layer squish tests while baby stepping the Z between squares for a fine tune. Next I did the extrusion multiplier cube test for this filament, temperature, and new hotend to fine tune the flow. No complaints for the price based on my particular situation of shorted heater and thermistor.Not sure I'd do buy this if I was in a position where my normal hotend was working fine. There are many options when you look at direct drive extruders and upgraded hotends like Dragon, Rapido, and Dragon Ace. Since my printer was not functional to print a new toolhead prints the upgraded hotend was not on my list of options.
M**E
High quality hotend
this was bought to bring my Elegoo Neptune 2s back to life, and it did just that. before my printer whould get stuck pushing out filament but with this its now able to print things it couldn't. Recommend this if you need a new hot end.
Trustpilot
1 month ago
2 months ago
2 months ago
1 month ago