Description
🎬 Elevate your viewing game — go big, go bold, go Akia!
- TRUSTED SUPPORT WARRANTY - Backed by a 1-year manufacturer warranty and lifetime US-based tech support for peace of mind and lasting performance.
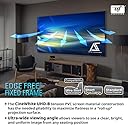
- EFFORTLESS SETUP SLEEK DESIGN - Lightweight 6-piece split aluminum frame with edge-free design and included full installation kit for quick, flawless mounting.
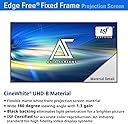
- CRYSTAL CLEAR VISUALS EVERY TIME - CINEWHITE UHD-B material with 1.3 gain ensures vibrant 4K Ultra HD and Active 3D projection with ISF-certified color accuracy.
- CINEMATIC IMMERSION MASSIVE SCALE - 125-inch diagonal with a 16:9 aspect ratio delivers a true home theater experience that commands attention.
- UNIVERSAL COMPATIBILITY FUTURE PROOF - Works seamlessly with standard, short throw, UHD, and HD projectors, making it a versatile centerpiece for any space.
The Akia Screens 125-inch Edge Free Fixed Frame Projector Screen offers a premium 16:9 CineWhite UHD-B surface optimized for 4K Ultra HD and 3D projection. Featuring a massive 125-inch diagonal size with a 180-degree viewing angle, this lightweight, easy-to-install screen includes a full mounting kit and is ISF certified for true-to-life color accuracy. Designed for indoor home theaters and professional presentations, it supports a wide range of projector types and comes with a 1-year warranty plus lifetime US-based tech support.