Description
🔥 Upgrade your 3D printing game with smart precision and fail-safe power! ⚡
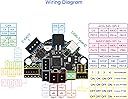
- DIY READY EXPANSION - Multiple reserved interfaces including I2C, RGB lighting, and material blockage detection to customize your 3D printing experience.
- FIRMWARE FLEXIBILITY - BOOT and RESET buttons plus USB DFU mode enable quick firmware updates without hassle—stay ahead with the latest features.
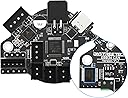
- ROBUST SAFETY DESIGN - Enhanced ESD protection and isolated power circuits safeguard your mainboard from electrical damage and overheating.
- SEAMLESS CONNECTIVITY - Switch effortlessly between CAN bus and USB interfaces for streamlined wiring and faster setup.
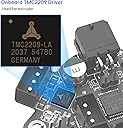
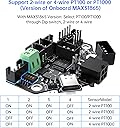
- PRECISION THERMAL MANAGEMENT - Integrated MAX31865 sensor supports 2-wire/4-wire PT100/PT1000 for ultra-accurate hotend temperature monitoring.
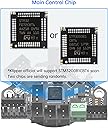
The BIQU EBB36 CAN Bus Adapter Board is a compact, high-performance extruder controller designed for 36-stepper motors, featuring onboard MAX31865 for precise PT100/PT1000 temperature sensing, dual CAN/USB communication, and advanced safety protections. Its rich expansion ports and firmware update capabilities make it the ultimate upgrade for Ender 3 and BLV printers, delivering reliable, customizable, and future-proof 3D printing performance.