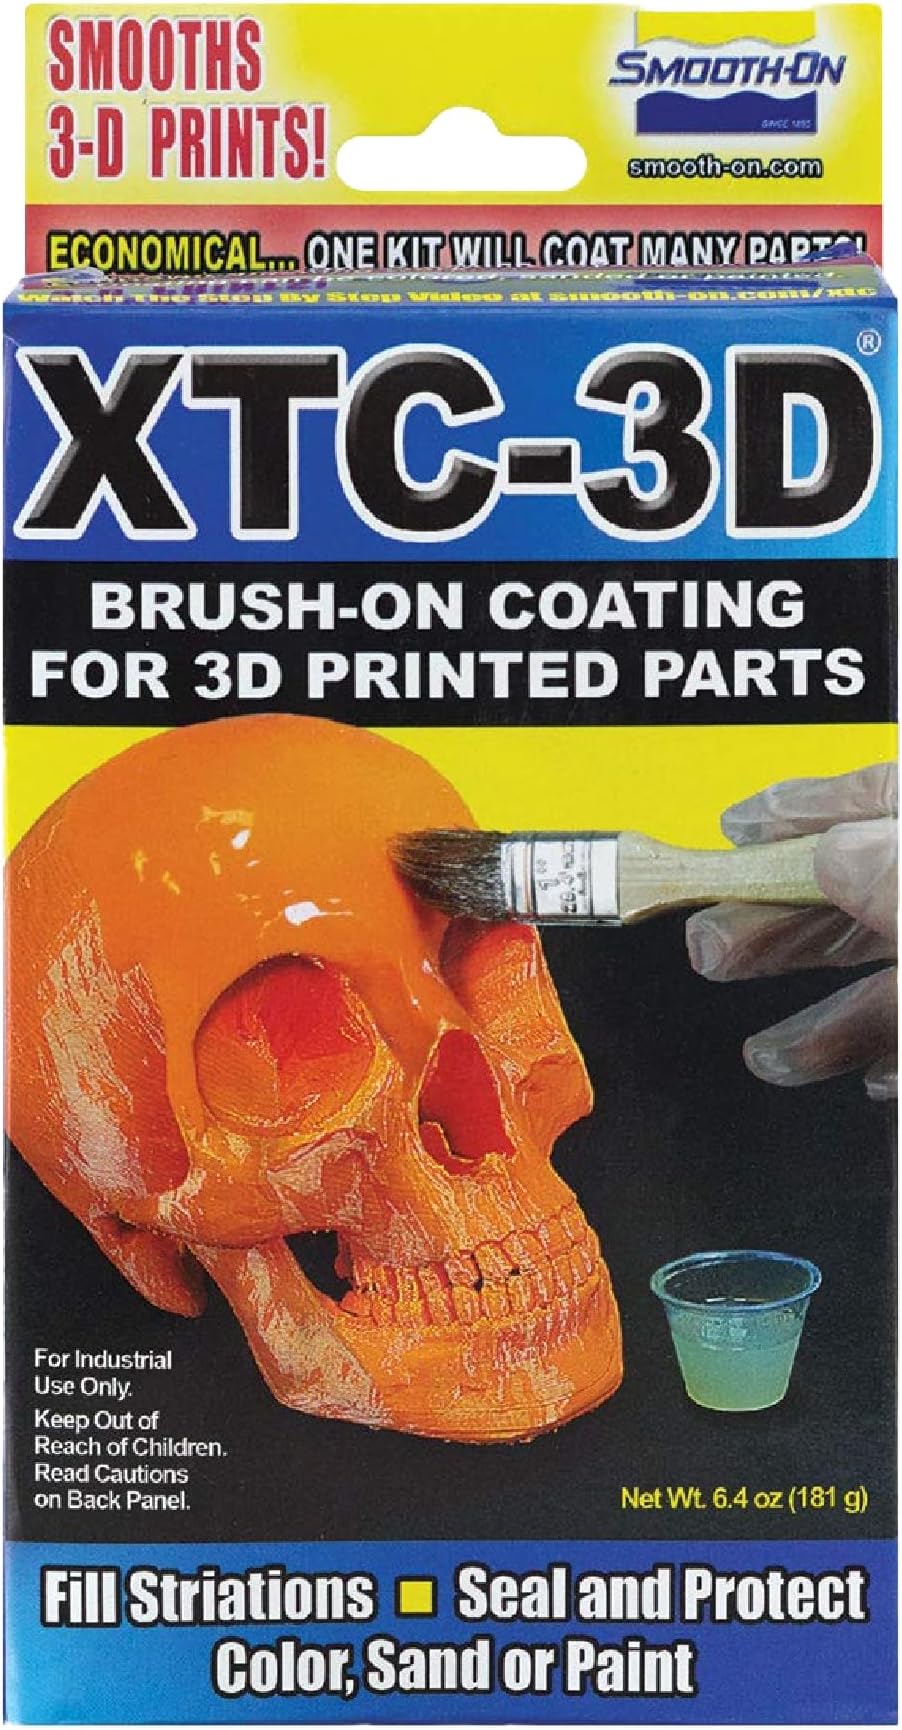


Buy anything from 5,000+ international stores. One checkout price. No surprise fees. Join 2M+ shoppers on Desertcart.
Desertcart purchases this item on your behalf and handles shipping, customs, and support to Poland.
✨ Elevate your 3D prints with a flawless, glossy armor! 🛡️
Smooth-On XTC-3D™ is a high-performance, clear epoxy coating designed to smooth and protect 3D printed parts from various materials including SLA, SLS, PLA, and ABS. With a 2:1 mix ratio and a quick 10-minute working time, it self-levels to a durable, impact-resistant finish (80D Shore hardness) in just 3.5 hours, eliminating the need for sanding or vapor smoothing. Ideal for professionals seeking a glossy, scuff-proof finish that enhances both aesthetics and durability.


| Customer Reviews | 4.5 out of 5 stars 1,580 Reviews |
W**H
Perfect to add a protective, strong outer shell to your 3D printed work.
Very happy with the product. Working time is only about 15 minutes, so I used shot glass sized solo cups and painted small areas with each batch. Impossible to clean up, so everything was one-time disposable. I used foam paint brushes, latex gloves and solo cups. Wear worse clothes that you would not be heart broken if anything spills. Drop clothes on everything. Dry time (to handle) is about 3 hours. Glossy finish. No noticable fumes. Definetly adds a layer of strength which is immune to scuffs and scratches. I added pigment to the resin to get the color I wanted.
J**E
A must-have
XTC-3D is hands-down a must have for anyone with a 3d printer. I usually print in ABS and follow the old "tried and true" method of sanding followed by vapor smoothing followed by final sanding before painting. XTC-3D eliminates the need for all that extra effort. To ensure a problem-free flawless finish: - Make sure that your part is clean. Use isopropyl alcohol, acetone, or whatever appropriate cleaner for your material to wipe your print clean - Mix the resin with the hardener in the exact ratio specified. Adding more hardener than necessary will only increase difficulty in applying it. Make sure that you mix it THOROUGHLY! I cannot stress this enough; You must mix it and continue mixing it until it becomes crystal clear. The longer you mix it, the better your finish will be, but the shorter your working time will be. I recommend mixing small batches at a time - you can always mix more if you run out. - Make sure that the ambient temperature is within the recommended range. Trying to coat your print when the temperature is below 70F will obviously increase the time it takes to fully cure. The mixing cup that is included is flimsy and not very strong. I made the mistake of mixing a batch and leaving it in the cup while applying it and the heat nearly turned the mixing cup into jellly and rendered it worthless. After mixing, pour it into another container, onto some aluminum foil, etc then wipe the mixing cup out with a shop towel, paper towel, etc. The foam brush is not worth the hassle - this holds true for ANY foam brush. I recommend you get a decent paintbrush instead. The foam brush soaks up too much and deteriorates too quickly, but a paint brush can be cleaned out with acetone and reused several times. I was so impressed with this stuff that I ordered 24oz of it. Follow the directions, do the prep work and you will end up with repeatable flawless results.
D**S
Overall this stuff is great. I've been using it to make 3d printed ...
Overall this stuff is great. I've been using it to make 3d printed Mandalorian helmets. It mixes very easily, lasts quite a while on the plate, goes on well, sands easily, and has almost no smell. It's not perfect though, but the marketing for it really, really overstates how easy and good it is. The #1 thing is that when you're applying it, you *must* follow the instructions and keep brushing over it until it finally starts to harden up. This takes ~20-30 minutes or so, during which you're just sitting there brushing and brushing and brushing. If you don't do this, it dries smooth but lumpy and takes a ton of sanding to look good. If you just apply it, and maybe brush over it a few times, it looks like it's going on all nice and smooth, but when you come back an hour or two later (one positive is that it hardens up very nicely and quickly) the surface is going to be a bit like a golf ball. It's not runs or streaks (unless you slap tons of it on, getting drips is very unlikely), it just settles in a weird way, even if it's a second coat over an already smooth area. On the plus side, it does sand very nicely with 220 grit sandpaper. 100 grit is a bit too much unless you do end up with a drip. The end result is going to be good, but the "eliminates 90% of finishing work" moniker really gives you the wrong impression. I've finished 3d printed items with a coat or two of filler primer and gotten excellent results in about five minutes of work, as compared to the hours I've already put into using this stuff. Oh, and before you use it, buy a LOT of foam rubber brushes. Expect to use three or four of them over the course of a half ounce of material, especially with all the constant overbrushing you're going to have to do. After a few minutes the brush will start getting flimsy and if you keep using it, you'll end up with foam rubber bits on your surface. Michaels sells kits of a dozen or more of them for like $5. It works, but it takes a lot of time.
K**O
GREAT FOR COSPLAY!
MY LORD. This stuff is super cool!I did not use this to coat 3D printed parts. I personally use it for cosplay purposes. I coated my worbla and some foam pieces in this and it gave it a beautiful shiny smooth coat! It is great as a primer for Worbla as Worbla tends to have a very bumpy texture and with this you only need 1 or 2 coats to get a super smooth surface! It cuts priming time in half if you are used to using classic methods like coating it in 6-8 layers of wood glue! This took around 3-4 hours to cure up. I let it sit overnight. It is important to note that this has no flexibility once fully cured. I tested this on a piece of EVA foam and it just about shattered like glass when I warped the foam. I didn't expect it to NOT do this to be honest. It is resin. It did not flake off. It adheres to the foam. it just left a bunch of cracks all over the place! On pieces that will not bend at all, like weapons or shoulder pieces etc, I think this works well to give your foam pieces a smooth glossy finish. I had already primed my foam with several layers of plastidip before I decided to experiment. Plastidip + XTC-3D does work :). This is super easy to use! If you have used any sort of resin you will already have an idea. You have your resin and hardener. The instructions will explain how to mix but this comes with a handy little mixing cup with measurement markings on the side. It also comes with a foam brush and Popsicle stick for stirring. You will need to have more of these items handy for more than one use! The foam brushes work really well for application. Smooth-On offers online tutorial videos on You-Tube for this specific product. That helped a ton! Have tin-foil on hand to make a tiny pool to sit the product in. This increases the time to apply because letting in sit in the cup will cure up to fast and it'll be hard to apply. You wouldn't get a smooth application in this case! I'd imagine this would also work well as a nice shiny finish over paint! But I find It is SUPER shiny once cured. Almost TOO shiny. If this is not the look you want, you can just simply buff it down by sanding lightly over it. I still prefer a Shellac coating as my final step. With the Prime shipping this was the best deal I could find on this product! I highly recommend this!
U**L
Works as intended
I recently purchased this kit, and I couldn’t be happier with the results. This product is perfect for smoothing and finishing 3D prints, taking them from rough to a professional-grade finish with minimal effort. It arrived in perfect condition with all components included, and the instructions were straightforward and easy to follow. The resin itself applies smoothly with the included foam brush, and it cures to a hard, glossy finish that brings out the detail in each print. I noticed that it also fills in small layer lines, making post-processing much easier. Once cured, it provides a durable, protective coating that not only enhances the appearance but also adds strength to the print. Another bonus is that the resin doesn’t yellow over time, so prints keep their fresh, vibrant look. The kit provides a generous amount of product, making it excellent value for the price. I highly recommend this product to anyone looking to take their 3D printed projects to the next level with a high-quality, reliable coating solution!
A**S
Meh. It's normal epoxy.
I'm a big fan of Smooth-on products. Their OOMOO is great and I've dropped serious dough on their products over the years. Surprised with this, however. More than anything I'm not really sure why it's said to be specifically for 3D prints. It's basically the same as any other epoxy I've used just in a 2:1 mix ratio instead of a 1:1. My guess is that it allows you to mix smaller amounts with better accuracy but I could be wrong. Super high gloss. Easy to tint with acrylic paint or food coloring. Too thick to self-level but not thick enough to not run on vertical pieces. I don't hate it but I don't think I'll be buying another kit once this one is used up. Pretty stinky too, which makes sense for what it is, but if you mix more than a small amount make sure you've got ventilation. Pro tip: let it cure under your stove's (turned-on) exhaust vent (if you have one).
D**E
Works great does its job
works great! It goes on a little sticky at first, but once it cures, it does exactly what it’s supposed to — gives your prints a bold, shiny, professional look. A little goes a long way, and it really helps smooth out layer lines. Overall, very happy with the results and would definitely use again!
J**N
Works as advertised.
I use XTC 3d to smooth out print lines. It works very well for this purpose. I used it most recently for a 1/4 scale figure print (pictured). It's very easy to use while keeping some safety steps in mind. I wear gloves and eye protection. It will thicken within the ten minute working time. You want to avoid leaving it in the cup to reduce heat build up and fumes. I like to spread it thin on a piece of cardboard or plate for the best working time. Mixing the right ratio is key to hardening like any two part resin product. Drips will occasionally happen but they can be shaved or sanded down with little effort. I recommend thin layers to see how much detail you can preserve and still get most of the lines out . Overall I highly recommend xtc 3D for 3D prints. It fills layer lines very well for a smooth look once painted. It also provides a tough order coating.
M**.
Easy to work with
Dries nicely
T**C
Juste bien doser.
Très bon produit pour retirer les défaut d’impression 3d avant de les peindre il faut toute fois bien prendre deux dose du produit À pour 1 dose de B exemple 20ml À pour 10ml B ensuite bien mélanger. Attention toute fois a faire vite pour l’étaler car commence à sécher au bout de 15 à 20 minutes.
S**G
Bin zufrieden
Gefällt mir gut bei mein 3d druck
K**U
Saves time and money - print on thicker layer settings
+ makes layer lines a thing of the past + can be used before painting to create a perfectly smooth surface to paint on + you can paint first (but don't add a wash or anything that accentuates layer lines) and then use xtc3d over, and it helps to hide the layer lines + easy to use, it is a liquid when combined in a 1:1 ratio and levels itself, meaning you don't get unsightly brush marks + creates a decent surface coat which adds a finished feel to products + looks expensive but works out cheaply. One layer of xtc3d seems to be as effective as 4 layers of clear nail varnish. - if you get it on your hands, expect the feel/ smell to last for hours - requires a flat, smooth surface underneath your items or expect to accidentally pick up bits of debris or paper on it. I use a clear smooth glossy plastic wallet. - destroys your brushes very quickly. I bull bought loads of cheap paint brushes due to this - if you mix the ratio wrong, it will never set properly. I found adding too much of the runny liquid part did this, so don't experiment! Just do a straight 1:1 - they should provide more than one mixing cup as it gets dirty pretty quickly from residue so means 1:1 ratio is harder to achieve Love this stuff and swear by it. You aren't a real 3d printing expert until you have this finish :)
S**R
Caro pero efectivo
Aunque es un producto caro, cunde mucho. Hay que mezclar cantidades muy pequeñas y extenderlas dejando la capa mas fina posible (evitaras gotas). Se empieza a endurecer muy rápido, con lo que hay que andarse vivo para aplicarlo. Me está gustando mucho.
Trustpilot
1 day ago
2 months ago